By Owen Hayes
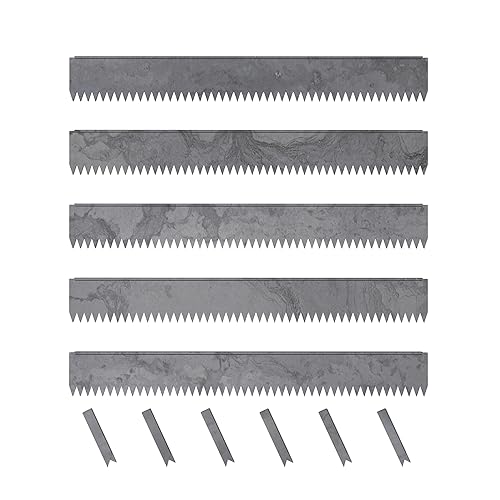
An easyflex 10 no-dig landscape edging stone is a stone-look edging piece designed to sit on the surface of the ground and hold a clean line between lawn and bed without a trench. In this guide you will learn how to plan the run, prepare the soil, set and secure the stones, and finish the border so it looks sharp for seasons. The steps below apply to most no-dig stone edging systems, so you can adapt them to your yard even if your layout is curved or uneven.
What You Need Before You Start
Good results depend more on preparation than on the stone itself. Before you open the box, measure the run, mark the path, and gather the tools below. Most of the job is quick, but the layout and leveling steps are where mistakes show up later.
Shopping for one? See our guide: Easyflex No Dig Landscape Edging Kit Review: Is It Worth It?.
- Flexible garden hose or marking paint to lay out the curve
- Landscape spray paint or stakes and string for straight runs
- Sharp spade or half-moon edger for cutting the sod line
- Rubber mallet for seating the stones
- Level, preferably a 4-foot straightedge with a bubble vial
- Pinning stakes or landscape spikes, if your product calls for them
- Coarse sand or crushed stone for the bedding layer, if the manufacturer specifies it
- Work gloves, knee pad, and a bucket for sod and debris
Step 1: Plan the Layout and Measure the Run
Lay out the border before you cut anything. Use a garden hose for curves so you can adjust the shape until it looks right from the house and from the sidewalk. For straight runs, set stakes at each end and pull a string tight, then mark along it with spray paint. Measure the total linear footage, then divide by the length of each piece to determine how many units you need, and add about 10 percent for cuts and mistakes.
Check your planned edge against any buried utilities. Call 811 before digging in the United States, even for shallow work, because the call is free and protects you from unexpected lines.
Step 2: Cut and Clear the Sod Line
Once the layout is marked, cut along the line with a sharp spade or half-moon edger. Aim for a clean vertical face, and try to keep the cut depth consistent so the stones will sit at a uniform height. Remove the sod, roots, and loose debris from the strip. Many installers find it easier to work in sections of 10 to 15 feet at a time, which keeps the soil from drying out or slumping before the stone is set.
Step 3: Prepare the Base Surface
A no-dig system still needs a firm, level base. Tamp the exposed soil with a hand tamper until it feels solid underfoot. If the soil is soft, add a thin layer of coarse sand or crushed stone and compact it. Check the manufacturer’s instructions for the required base depth, since it varies by product. Do not skip compaction. Settling is the most common cause of wavy stone lines.
Checking for Level and Slope
Place your straightedge across the base every few feet and adjust high spots. For proper drainage, most landscapers aim for a slight grade away from the bed and toward the lawn or a drain point, often around 1/8 inch per foot. Keep the finished height of the stone just above grade on the lawn side so a mower can pass without catching the edge.
Step 4: Set the Stones
Lay the first stone at the starting point, check it with the level, then position the next unit so the joint is tight but not forced. Work along the run in order, keeping the top edges aligned with your string line or the curve you marked. Use the rubber mallet to tap each piece gently into the base. Do not strike the stone hard enough to chip the face.
Joints should close cleanly. If a gap is wider than your product allows, adjust the piece or cut a shim from the same material rather than forcing the stones together.
Securing the Edging
If your system uses pins or spikes, drive them through the anchor points on the inside of the bed side, not the lawn side, so they stay out of the mower path. Set each pin until its head is flush or slightly below the stone surface. Recheck alignment after pinning, because the pins can shift a piece slightly.
Step 5: Backfill and Finish the Border
Fill the bed side with mulch, soil, or stone as your design requires. Keep the backfill below the top of the edging so the stone shows clearly. On the lawn side, lightly backfill with topsoil or sand to close any gap and help the turf grow tight against the stone. Water the area and check again for level once the soil has settled over the first few days.
Common Mistakes to Avoid
- Skipping compaction. Soft spots cause stones to rock and tilt. Tamp in layers.
- Setting the stone too high. A sharp lip makes mowing hard and invites scalping.
- Ignoring drainage. Water pooling behind the edging can push it out of line over time.
- Pinning from the lawn side. Exposed pins become mower hazards and rust quickly.
- Forcing joints. Tight squeezing chips the stone and leaves visible gaps later.
Tips for Clean, Long-Lasting Lines
- Work in short sections and check level after each one.
- Use a string line on straight runs and a hose on curves, then step back to review from several angles.
- Trim the lawn edge a few days after installation, once the turf has begun to knit against the stone.
- Inspect the line each spring and reset any stones that heaved after freezing.
If you are still comparing options, our overview of Stone Lawn Edging: Sizes, Base and Setting explains how sizing and base depth affect the finished look. You can also review the No-Dig EasyFlex Landscape Edging Review: Pros and Cons to see how this style compares with other no-dig approaches. For a lower-cost comparison, see Low Cost Landscape Edging: 7 Budget Picks Compared for Clean Lines, and for other stone-look options, check Top 7 Landscape Edging Faux Stone Options for Clean Garden Borders.
Recommended gear
A few tools make the install faster and more accurate, especially for a long run or a curved bed.
- Rubber mallet lets you seat stones without chipping faces. View on Amazon
- 4-foot aluminum level helps you check the run for level and slope across several units at once. View on Amazon
- Half-moon edger cuts a clean sod line along the marked path. View on Amazon
- Landscape marking paint makes it easy to lay out curves and straight lines before cutting. View on Amazon
FAQ
Do I need to dig a trench for an easyflex 10 no-dig landscape edging stone?
No trench is required in the traditional sense, but you do need to cut the sod line and prepare a firm, level base. Follow the manufacturer’s guidance on base depth for your specific product.
How high should the edging sit above the lawn?
Most installers keep the top of the stone just above grade on the lawn side, often a small fraction of an inch to about an inch, so mowers can pass cleanly. Check your product’s specified height.
Can I install it on a curve?
Yes. Lay out the curve with a garden hose, then cut and set the stones in short sections, checking alignment as you go. Tight curves may require more frequent adjustment.
What is the best time of year to install edging?
Spring and early fall are generally ideal because the soil is workable and moisture helps the turf recover. Avoid installing when the ground is frozen or saturated.
How do I keep stones from shifting over time?
Compact the base well, secure the stones with pins if the system calls for them, and keep the bed side backfilled. Recheck level each spring after the ground thaws.
Can I mow directly over the edging?
Mowing over the top edge is usually fine if the stone sits flush or slightly above grade and is set correctly. Avoid setting it so high that the mower deck strikes it.
Do I need to remove grass before installing?
Yes. Cut and remove the sod along the marked line so the stone sits on mineral soil or a prepared base rather than on top of turf roots.
Will weeds grow along the edge?
Some weeds may appear at the seam between stone and lawn. Keeping the lawn side well backfilled and trimming regularly reduces this, and a light mulch or landscape fabric on the bed side helps control weeds there.
Conclusion
A clean border starts with careful layout, proper sod removal, and a compacted, level base. Work in short sections, check alignment often, and secure the stones according to the manufacturer’s directions. With those steps in place, your easyflex 10 no-dig landscape edging stone should hold a crisp line for seasons with only occasional checks.
Related reading
- No-Dig EasyFlex Landscape Edging Review: Pros and Cons
- Top 7 Landscape Edging Faux Stone Options for Clean Garden Borders
- 7 Best Landscape Edging Natural Stone Options for Clean Lines (2026)
Ready to choose one?

About Owen Hayes
Owen writes about lawn edging & trimming. Each guide starts with research into how products are built and what owners report after months of use, and is revised when better options appear.