By Owen Hayes
Metal landscape edging from Menards is a practical way to keep lawn lines sharp, stop grass from creeping into beds and make mulch stay where it belongs. In this guide you will learn how to pick the right metal profile and height, plan your layout, cut and set the strips, and avoid the mistakes that cause wavy or heaving borders. The steps apply whether you buy a roll of steel edging or a set of sectional stakes.
What You Need to Know Before You Buy Metal Landscape Edging at Menards
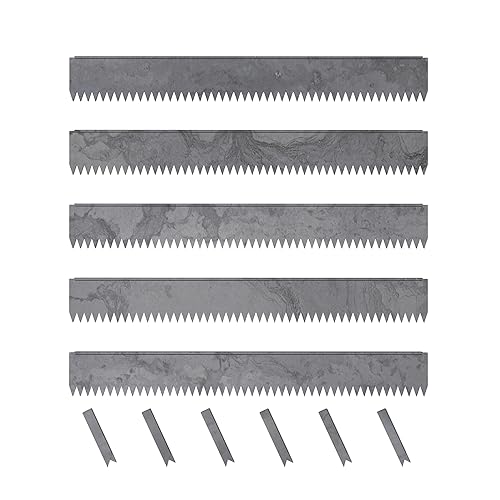
Menards stocks several types of metal edging, and they differ in thickness, height and how they hold their shape. Before you walk the aisle or add anything to a cart, decide what the edging needs to do. A bed that holds heavy stone needs a stiffer product than a strip separating turf from a mulched shrub bed.
Shopping for one? See our guide: 6 Best Metal Landscape Edging Material Options for Clean Lawn Lines.
Check the packaging or product page for the gauge (thickness), the exposed height above grade and the length per roll or piece. Manufacturers typically specify the depth the stakes should be driven, so read that line before you plan your stake count. If you are unsure which family of product fits your site, compare the options in Metal Landscape Edging Nearby: How to Find and Choose the Right Option and Metal Landscape Edging Col Met: 5 Best Options for Clean Lawn Lines.
Common Metal Types
- Galvanized steel: Zinc-coated for rust resistance and the most common choice for straight runs. Works well for lawn-to-bed separation.
- Corten (weathering) steel: Develops a stable rust-brown patina and is often used for a more architectural look. Review 9 Best Corten Metal Landscape Edging Options for Clean Lawn Lines for style comparisons.
- Aluminum: Lighter and easier to bend, but less rigid. Often better for curves than for long straight runs with heavy soil pressure.
- Flexible or corrugated strips: Bend to follow curves and are easy to adjust after installation. See 9 Best Flexible Metal Landscape Edging Options for Clean Lawn Lines (2026) for examples.
How to Plan the Layout
Good edging starts with a plan on the ground, not with a hammer. Mark the route with a garden hose or landscape paint before cutting anything. Smooth, generous curves look better and are easier to maintain than tight kinks that trap clippings.
Measure and Mark
- Lay a hose along the planned line and step back to check the view from the sidewalk or patio.
- Measure the total length in feet. Add 10 percent to cover overlaps, cuts and mistakes.
- Mark stake positions every 12 to 18 inches on straight runs and every 8 to 12 inches on curves.
- Note any utility lines. Call 811 before digging anywhere in the US.
Check Height and Grade
Decide how much of the strip should show above the soil. A typical residential setup exposes about 1 to 2 inches of a 4- to 6-inch strip. Taller exposed height may be useful beside mulch, but it can be hit by mowers and trimmers. Because grade changes affect the top line, set a string line with a level at both ends to see how the top will sit.
Tools and Materials Checklist
- Metal edging strips and matching stakes or connectors
- Garden hose or landscape paint for layout
- Flat spade or edging spade
- Rubber mallet or dead-blow hammer
- Metal snips or an angle grinder with a cut-off wheel (wear eye and hearing protection)
- Four-foot level and a string line
- Tape measure
- Gloves and knee pads
Step-by-Step Installation
Step 1: Dig the Trench
Cut along the layout line with a flat spade, then lift the sod. Dig a trench just deep enough that the strip can sit with its top at the height you chose. For a 6-inch strip with 2 inches exposed, the trench should be about 4 inches deep, plus a little extra for a gravel base if your soil drains poorly.
Step 2: Add a Base If Needed
In clay or heavy soil, add 1 to 2 inches of compacted crushed stone or sand to the bottom of the trench. This helps the strip stay level and reduces heaving after freeze-thaw cycles. Compact the base with a hand tamper before setting the metal.
Step 3: Set the First Section
Place the first strip in the trench and check that the top edge is at your target height using the level. Drive the stake through the strip’s stake loops, or into the soil beside the strip if your product uses separate stakes. Keep the stake angled slightly toward the bed side to help it grip.
Step 4: Continue Along the Line
- Overlap or connect sections according to the manufacturer’s joiner instructions.
- Check level and alignment every few feet, not just at the start.
- Tap stakes down evenly. Driving one end deep and leaving the other high causes twisting.
Step 5: Cut and Finish the Ends
Measure carefully before cutting. Cut with metal snips for thin gauges or an angle grinder for thicker steel. File sharp edges smooth. Finish the ends by tapping them into the soil or against a stake so the line looks continuous.
Step 6: Backfill and Tamp
Backfill the lawn side with soil and firm it by hand or with a tamper. Water the area lightly to settle the soil. Check the top line again after watering and make small adjustments.
Common Mistakes to Avoid
- Installing too shallow: Strips pop up after freezing or when mowers hit them. Bury enough of the strip to hold it firmly.
- Skipping the level check: Small dips become obvious once mulch or sod is in place.
- Using too few stakes: Long straight runs can bow outward under soil pressure. Add stakes if the line looks loose.
- Cutting into the mower path: Leave room for the mower wheels so the edge does not get bent.
- Forgetting to plan for expansion and contraction: Metal moves slightly with temperature. Leave the joiners a little loose if the product allows.
Tips for a Clean, Long-Lasting Border
- Install edging before spreading mulch so you do not have to dig through it later.
- Cut the sod with a half-moon edger first, then set the metal into the clean line.
- Trim grass along the top edge with a string trimmer held at a slight angle to keep the line crisp.
- Inspect the edging each spring and reset any stakes that have heaved.
- For a broader look at materials and their trade-offs, read Lawn Edging Materials Compared: Metal, Plastic, Stone.
Recommended gear
A few supplies make the job faster and the results cleaner. Choose tools that match the gauge and profile of your edging.
- Rubber dead-blow mallet: Drives stakes without marring the metal top edge. View on Amazon
- Edging spade with a flat blade: Makes a straight, clean trench through sod. View on Amazon
- Angle grinder with metal cut-off wheels: Cuts thicker steel strips quickly. Use eye and hearing protection. View on Amazon
- Four-foot aluminum level: Checks the top line across longer runs. View on Amazon
FAQ
Is metal edging from Menards good for straight lawn borders?
Yes. Galvanized steel and aluminum products are widely used for straight lawn-to-bed separation. Choose a thicker gauge for long straight runs and check the manufacturer’s stake spacing.
How deep should I install metal landscape edging?
Most residential installations bury about 2 to 4 inches of a standard 4- to 6-inch strip, leaving the rest exposed. Follow the depth and stake guidance printed on the product packaging.
Do I need a concrete base for metal edging?
Usually no. A compacted gravel or sand base of 1 to 2 inches helps in heavy or wet soil, but concrete is generally not required for standard residential edging.
Can metal edging be installed in curves?
Flexible and corrugated strips work best for curves. Rigid steel can be bent gently, but tight radii may kink. Use more stakes along curves for stability.
How long does metal edging last?
Lifespan depends on metal type, thickness, soil conditions and climate. Galvanized and Corten steel generally hold up well for many years when installed correctly. Owners often report that properly seated stakes prevent most long-term problems.
Should I use mulch on the bed side of metal edging?
Yes, mulch works well beside metal edging. Keep mulch just below the top edge so it does not spill over onto the lawn during rain or mowing.
When should a professional install my edging?
If your project involves major grade changes, retaining walls, or utility lines you cannot locate, consult a qualified landscape contractor or your local utility locating service before digging.
Conclusion
Metal landscape edging from Menards gives you a crisp, durable border when you plan the layout, dig a clean trench and set each stake firmly. Check the height and gauge before you buy, and take time to level as you go. With those steps, a straight or gently curved line can stay sharp for many seasons.
Related reading
Ready to choose one?

About Owen Hayes
Owen writes about lawn edging & trimming. Each guide starts with research into how products are built and what owners report after months of use, and is revised when better options appear.