 By Lauren Holland
Updated November 2026
Installing groundsmart 4 roman brick rubber landscape edging is a manageable weekend project that gives you a crisp, permanent border between lawn and beds. In this guide you will plan the layout, cut and trench the path, seat the edging so the top sits at the right height, anchor it properly, and backfill for a finish that stays straight through mowing seasons. The steps below assume a standard residential lawn and basic hand tools.
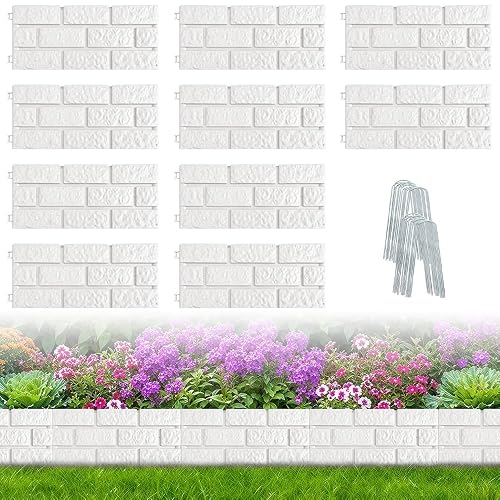
Before you start, it helps to know what this product is designed to do. Rubber edging of this style is flexible enough to follow curves, yet stiff enough to hold a line once it is staked and buried. The roman brick profile is meant to look like a row of masonry without the weight or labor of real brick. Read the manufacturer’s specifications on the packaging for your exact section length, stake spacing and minimum burial depth, since those details can vary by batch and retailer. For a broader look at how this product compares to other styles, see Groundsmart Roman Brick Landscape Edging: Install Steps for Clean Lines and Groundsmart Brickface Landscape Edging: Install Steps and Tips for Clean Lines.
Shopping for one? See our guide: 6 Best Recycled Rubber Landscape Edging Options for Clean Lawn Lines.
What You Need Before You Start
Gather everything first so you are not stopping mid-trench. Most installs use the following:
- Groundsmart roman brick rubber edging sections, plus enough connectors if your run exceeds one piece
- Stakes or spikes supplied with the kit, and a rubber mallet
- Garden hose or marking paint for laying out the curve
- Flat spade or edging spade for cutting a clean trench
- Hand tamper or the back of a shovel for compacting soil
- Tape measure, level (a 4-foot level works well), and a utility knife
- Sand or fine gravel, roughly 1 inch deep, if your soil drains poorly
- Topsoil or mulch for backfill
Step 1: Plan the Layout and Mark the Line
Lay out your border with a garden hose for curves or a string line for straight runs. Walk around the shape and step back from several angles to judge how it reads from the house. Adjust until you are happy, then mark the centerline with marking paint or landscape flags every 2 to 3 feet.
Plan your bed depth and mowing path before digging. The edging should sit where the mower wheels can run along the outside, so the grass tips trim cleanly without you needing a string trimmer on every pass. If you are unsure how to handle long curves, Wood Landscape Timber Edging: A Step-by-Step Install Guide covers layout strategies that also apply here.
Step 2: Cut the Trench Correctly
Measure the Trench Depth
Dig a trench deep enough to bury the bottom of the edging and leave the top at the height you want. Most installers aim for the top rim to sit about 1 inch above the finished grade on the lawn side, so the mower deck clears it. Dig the trench so the lower portion of the profile is fully covered, typically around 3 to 4 inches deep for a standard roman brick profile, but confirm against the kit instructions.
Cut a Clean Vertical Wall
Use a flat spade to slice straight down along the marked line. Keep the wall vertical on the lawn side, because any slope will push the edging out of line over time. Remove the sod and set it aside if you want to reuse it on bare spots.
Check the Trench Bottom
Smooth the bottom with the back of the spade so it is even. High spots will make the edging rock; low spots will leave it sitting too deep. Run your hand along the trench to feel for both.
Step 3: Set the First Section and Check Level
Start at a fixed point, such as a corner or a driveway edge, and place the first section in the trench. Check it with a level both side to side and front to back. Groundsmart rubber edging is flexible, so you can nudge sections into a smooth arc, but the top line should stay consistent in height from one piece to the next.
Connect each new section to the previous one using the joint method supplied with your kit. Press joints firmly and confirm they seat flush. A small gap or step at a joint will show up clearly once the border is finished.
Step 4: Anchor the Edging With Stakes
Stakes hold the line against soil pressure and mower bumps. Drive them through the pre-punched holes on the lawn side, or on the bed side if the kit specifies that. Space stakes roughly every 12 to 18 inches on curves and up to about 2 feet on straight runs, unless the manufacturer lists different intervals.
- Set the stake vertically against the edging.
- Tap it down with a rubber mallet until the head sits just below the top rim.
- Check the line again with a level after each few stakes.
Do not overdrive stakes. Driving them too far can crack the rubber or pull the top out of line.
Step 5: Backfill and Compact
Backfill the trench with soil on both sides of the edging, working in layers of about 2 inches. Tamp each layer lightly so there are no voids underneath. On the lawn side, replace sod or topdress with soil and seed as needed. On the bed side, add topsoil or mulch up to about an inch below the top rim so mulch does not spill over.
Water the area thoroughly. Settling is normal in the first few weeks, so inspect the line after a few rains and add soil where you see low spots.
Step 6: Final Inspection
Walk the full length and sight down the top rim from both ends. Look for waves, bumps at joints and sections that have lifted. Re-level any section that looks off. A few minutes of adjustment now prevents months of visible imperfection.
Quick Reference Table
| Stage | What to Check | Typical Target |
|---|---|---|
| Layout | Curve and bed depth | Smooth arc, mower path clear |
| Trench | Depth and wall | Vertical lawn-side wall, even bottom |
| Setting | Level and joints | Consistent top height, flush joints |
| Staking | Spacing and seating | Every 12 to 24 inches per kit guidance |
| Backfill | Compaction | Layers about 2 inches, no voids |
Common Mistakes
- Setting the edging too high. A tall rim scalps the grass and makes the lawn look sunken.
- Skipping the level check. Small errors compound across a long run.
- Loose or missing stakes. Without firm anchoring, the line drifts after the first freeze-thaw or heavy rain.
- Uneven trench bottom. Rocks and high spots cause rocking and gaps.
- Backfilling with loose soil only. Compact in layers to avoid settling.
- Forcing sections to bend too tightly. Sharp curves can kink the profile. Use shorter pieces or a gentler radius.
Tips for a Cleaner Finish
- Install on slightly damp soil; it is easier to cut and compacts better than very dry or waterlogged ground.
- Plan joints away from high-traffic spots, such as where someone steps off a walkway.
- Keep a small piece of scrap edging to test joint fit before connecting full sections.
- If you are working in heavy clay, a layer of sand under the edging improves drainage and helps seat it evenly.
- Check the line after the first mow and touch up any lifted areas right away.
Recommended gear
- Edging spade: A flat, sharp spade makes straight, vertical trench walls much easier than a round shovel. View on Amazon
- Rubber mallet: Drives stakes and seats sections without cracking the rubber. View on Amazon
- 4-foot level: Checks the top line across longer runs so the border stays consistent. View on Amazon
- Hand tamper: Compacts backfill in layers to prevent settling and gaps. View on Amazon
FAQ
Do I need to dig a trench for groundsmart 4 roman brick rubber landscape edging?
Yes. A trench lets you bury the lower portion of the profile so the edging stays put and the top sits at the correct height. Skipping the trench usually leads to tilting and gaps.
How deep should the edging be buried?
Bury the lower part of the profile fully, leaving the top rim about 1 inch above finished grade on the lawn side. Confirm the exact depth in the kit instructions, as profiles can differ slightly.
How many stakes do I need?
Plan on stakes every 12 to 18 inches on curves and up to about 2 feet on straight sections. Follow the spacing listed in the manufacturer’s directions for your specific kit.
Can I install it on a curve?
Yes. The rubber flexes enough for gentle arcs. For tight curves, use shorter pieces and stake more frequently to avoid kinking.
Can I install it in winter or in frozen ground?
It is best to install when the ground is workable and not frozen. Frozen soil is difficult to trench and will not compact properly.
Will mulch or soil cover the top of the edging?
It should not. Backfill the bed side only up to about an inch below the top rim so mulch stays in the bed and the edging remains visible.
How do I fix a section that has sunk or lifted?
Dig out the soil around the section, reset it to the correct height, re-stake if needed, and backfill in thin layers. Check it with a level before you finish.
Should I consult a professional for a large project?
For very long runs, steep slopes, or areas with buried utilities, consider consulting a landscape professional. Call your utility locator service before digging.
Conclusion
With careful layout, a clean vertical trench, level setting, firm staking and layered backfill, groundsmart 4 roman brick rubber landscape edging can give your lawn lines a sharp, lasting finish. Take your time on the first few sections, since those set the reference for everything that follows. Check the line after rain and mowing, and touch up any movement early.
Related reading
Ready to choose one?
About Lauren Holland
Lauren Holland is part of our editorial team and reviews and edits our lawn edging & trimming guides, checking product details against manufacturer specifications and owner feedback.