 By Lauren Holland
Updated November 2026
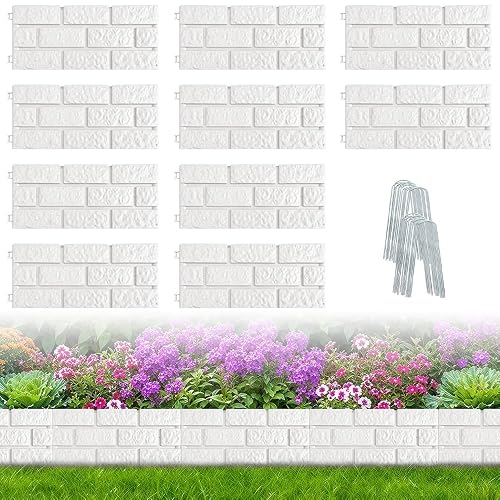
Groundsmart roman brick landscape edging is a segmented, interlocking edging system designed to create a firm, low border between your lawn and beds. In this guide, you will learn how to plan the run, prepare a stable base, set and join the sections, backfill the outside edge, and keep the line clean over time. Most homeowners can complete a straight run of 20 to 30 feet in a weekend with basic hand tools.
Roman brick style edging is popular because it looks like a traditional paver border while staying easy to cut and reposition. The steps below apply to the general installation method for segmented Roman-style edging, so always check the manufacturer’s instructions for your specific product before you start, especially for depth and joint details.
Shopping for one? See our guide: 5 Best Menards Landscape Edging Bricks for Clean Lawn Lines (2026).
Before You Start: Planning the Border
A clean edge depends more on planning than on any single installation step. Spend time walking the layout before you dig, because a border that wanders by an inch every few feet will look sloppy no matter how carefully you set each piece.
Mark the Line
Use a garden hose, a length of rope, or landscape marking paint to lay out the curve or straight run. For curves, a hose works well: move it in small adjustments until the arc flows smoothly, and avoid tight radii that force the blocks to fight the shape. Once you are satisfied, trace the outer edge with spray paint or a flat shovel.
Check Utilities and Drainage
Call 811 before digging to have underground utility lines marked. Also note where water runs off your yard. Edging can act as a dam, so if standing water collects behind it, plan a gap or adjust the grade.
Tools and Materials Checklist
- Roman brick edging sections (the full run plus a few spares for cuts)
- Garden hose or rope for layout
- Spray paint or marking flags
- Flat spade or half-moon edger for trenching
- Hand tamper or plate compactor
- Level (4-foot preferred) and a line level
- Crushed stone or road base for the foundation
- Coarse sand for leveling (if the product calls for it)
- Rubber mallet
- Tape measure and utility knife
- Work gloves and safety glasses
For a broader look at how this product type compares with other materials, see What Are the Best Options for Landscape Edging? 7 Choices Compared.
Step-by-Step Installation
Step 1: Excavate the Trench
Dig a trench along the marked line that is wide enough to hold the edging plus about 2 inches of base material on each side. The depth should bring the top of the edging to the height you want, usually slightly above the lawn, with the bottom of the block sitting on a compacted base. Most Roman-style sections are roughly 3 to 4 inches tall, so a trench about 4 to 5 inches deep, plus base depth, is a reasonable starting point. Confirm the exact depth against your product’s packaging.
Step 2: Build and Compact the Base
Add 2 to 3 inches of crushed stone or road base to the bottom of the trench. Spread it evenly, moisten it lightly, and compact it with a hand tamper in passes until the surface is firm and does not shift underfoot. A well-compacted base is the single biggest factor in preventing heaving and wobble later.
Step 3: Add the Leveling Layer
If your product calls for it, spread a thin layer of coarse sand (about three-quarters of an inch) over the compacted base. Smooth it with a board and check that it is consistent along the full length. This layer lets you fine-tune each section’s height without disturbing the base.
Step 4: Set the First Sections
Start at a fixed reference point, such as a corner or the end of a bed. Set the first section, then check it with a level both side-to-side and front-to-back. Adjust the sand layer beneath as needed. A straight run should keep the top edge within about one-eighth inch of the line you want across each 4-foot level check.
Step 5: Interlock and Join the Sections
Set each following section so that its connectors or joint features lock into the previous one. Press firmly and use a rubber mallet to seat the section, tapping gently rather than hammering. Check alignment after every two or three pieces so errors do not accumulate.
Step 6: Cut Sections to Fit
Mark the cut on the section, then score it with a utility knife or use a masonry blade on a saw designed for the material. Wear eye protection. Dress the cut edge so it sits flush. Keep offcuts for ends and corners to reduce waste.
Step 7: Handle Curves
On curves, the joints will open slightly on the outside of the arc and close on the inside. Keep the curve gradual, and where the radius is tight, consider cutting sections in half or using a product made for curved work. Check that the curve stays consistent by sighting along the top edge.
Step 8: Backfill and Finish
Once the run is set and locked, backfill behind the outside of the edging with soil or gravel, compacting lightly as you go. This stabilizes the outer face. On the lawn side, lay sod or seed up to the edge so the grass meets the border cleanly. Water the new edging area lightly to settle the soil.
Key Measurements at a Glance
| Item | Typical Guidance |
|---|---|
| Base material depth | 2 to 3 inches, compacted |
| Leveling sand layer | About three-quarters of an inch, if specified |
| Level check interval | Every 4 feet along the run |
| Height tolerance across a 4-foot check | Within about one-eighth inch |
| Utility marking | Call 811 at least a few business days ahead |
Always confirm these figures against your specific product’s installation sheet, since segment height and joint design vary.
Common Mistakes to Avoid
- Skipping compaction. Loose base material leads to settling, leaning sections, and gaps that appear within a season.
- Setting the top edge too low. Mowers can scalp the lawn or bump the edge if it sits flush with the grass. Leave a small reveal above the soil.
- Letting errors accumulate. Checking only at the start of a run often produces a crooked finish at the far end. Level and sight the line every few sections.
- Forcing tight curves. Pushing sections into a sharp arc can crack connectors. Use a gentler curve or cut pieces to suit.
- Ignoring drainage. A solid border can trap water in beds. Add weep gaps or regrade where needed.
- Backfilling unevenly. Heavy soil piled on one side can push the edging out of line over time.
Tips for a Clean, Lasting Line
- Install on a dry day. Wet soil is harder to compact and harder to dig cleanly.
- Set a string line between two stakes as a visual guide for straight runs.
- Mow the lawn at its normal height along the new edge for the first few weeks so the grass fills in neatly.
- Inspect the border each spring. Re-seat any section that has shifted and refill low spots behind it.
- Keep mulch a few inches away from the top of the edging so it does not spill over and hide the line.
- If you are comparing the look of brick-style edging with other options, Groundsmart Brickface Landscape Edging: Install Steps and Tips for Clean Lines covers a related product in detail.
Recommended gear
A few tools make the job faster and the results more accurate. These are general-purpose items that suit this type of edging installation.
- Half-moon edger. Helps cut a crisp, vertical trench line that matches the edging profile. View on Amazon
- Four-foot torpedo level. Lets you check the top edge along a full 4-foot span, which is the key to a straight run. View on Amazon
- Hand tamper. Compacts the base in small areas and corners where a plate compactor will not fit. View on Amazon
- Masonry blade for a circular saw. Makes clean cuts through concrete-based edging sections. View on Amazon
FAQ
Do I need a concrete base for groundsmart roman brick landscape edging?
Not always. Many segmented edging systems are designed to sit on a compacted crushed stone base with a sand leveling layer. Check your product’s instructions, since some specify a particular base depth or material.
How deep should the trench be?
The trench must be deep enough to hold the section plus the base and leveling layers, with the top sitting just above the soil. Measure your specific segment height and add the base depth, then confirm against the manufacturer’s guidance.
Can I install it myself?
Yes, for straight runs and gentle curves, most homeowners with basic tools can manage it. For large projects, retaining walls, or areas with significant grade changes, consider consulting a professional landscaper.
How do I keep the edging from moving over time?
Proper compaction of the base, correct leveling, and careful backfilling are the main factors. Inspect each spring and re-seat any sections that have shifted.
Can I cut the sections?
Yes. Mark the cut line, score it, and use a suitable masonry blade if needed. Always wear eye protection and a dust mask when cutting.
Will mowers damage the edging?
Setting the top a small amount above the soil and mowing at a normal height reduces the risk. Keep the mower wheels on the lawn side and avoid bumping the edge repeatedly.
How do I handle drainage behind the border?
If water pools behind the edging, leave small gaps or regrade the bed so water can flow away. A solid border that blocks drainage can cause soil erosion and staining.
Is this product suitable for every yard?
It suits many residential lawns and beds, but very wet soil, steep slopes, or heavy traffic areas may call for a different approach or professional advice.
Conclusion
With careful planning, a well-compacted base, and steady leveling, groundsmart roman brick landscape edging can give your lawn a sharp, lasting border. Work in short sections, check your line often, and backfill evenly. A little patience at the start prevents shifting and gaps later, so the finished edge stays clean for seasons to come.
Related reading
- Groundsmart SmartLoc Cobblestone Landscape Edging: 6 Best Picks Compared (2026)
- Wood Landscape Timber Edging: A Step-by-Step Install Guide
- Top 7 Landscape Edging Faux Stone Options for Clean Garden Borders
- Top 6 Stacked Stone Landscape Edging Picks for Clean Garden Borders
Ready to choose one?
About Lauren Holland
Lauren Holland is part of our editorial team and reviews and edits our lawn edging & trimming guides, checking product details against manufacturer specifications and owner feedback.