As an Amazon Associate I earn from qualifying purchases. This page may contain affiliate links.
Col-met steel landscape edging is a metal border that holds mulch, gravel, and soil in place while giving your lawn a sharp, defined line. In this guide you will learn what the product is, how to plan the layout, how to cut and set the sections, and how to keep the edge looking clean for years. Most of the work is measuring and leveling, so the steps below focus on getting those right.
What Col-Met Steel Landscape Edging Is
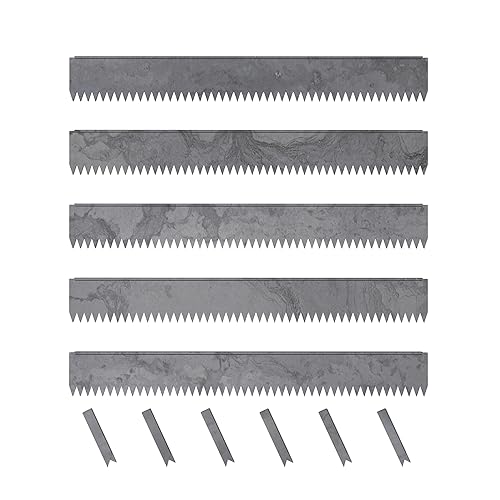
Col-met steel landscape edging refers to steel edging products from the Col-Met line, which are sold as flexible or rigid strips intended to separate turf from planting beds, walkways, and gravel areas. Steel edging is valued for its thin profile, which lets it disappear below the grass line, and for its stiffness, which keeps curves and straight runs from wandering over time. Manufacturers typically specify coated or galvanized finishes to slow rust, so check the product sheet for the exact coating on the section you buy.
Shopping for one? See our guide: Metal Landscape Edging Col Met: 5 Best Options for Clean Lawn Lines.
Before you buy, confirm the strip height, wall thickness, and stake spacing listed by the manufacturer. Those three numbers determine how deep you need to dig and how many stakes you will need. If you are weighing options, our roundup of Steel Edging for Landscape: 7 Best Picks for Clean Lines (2026) compares several steel profiles side by side.
Planning Your Layout Before You Dig
A clean edge starts on paper, or at least with a garden hose and a can of marking paint. Lay the hose in the shape you want, step back, and adjust until the curves flow without tight kinks. Tight radii are harder to hold with steel, so keep curves gentle, generally with a radius of several feet or more.
- Outline the bed with a garden hose or landscape paint, keeping the lawn side of the line on the side you want to mow.
- Measure the total linear footage, then add about 10 percent for cuts, corners, and waste.
- Mark where the edging will meet hardscape such as patios, walks, or driveways, since those spots need clean butt joints or ends.
- Check for buried utility lines by calling 811 before you dig. This is a free service in the United States, and it is required before excavation in most places.
- Decide whether the bed side will be mulched, graveled, or planted, because that affects how much soil you need to backfill.
Tools and Supplies You Will Need
Gather everything before you start so you are not stopping mid-run with a half-dug trench. Most installs take an afternoon for a single bed and longer for a full yard.
- Col-met steel edging sections and matching stakes or spikes
- Flat spade or edging spade for trenching
- Rubber mallet or dead-blow hammer for setting the strip
- Tin snips or a metal-cutting blade for cutting steel
- Line level, string line, and a 4-foot level
- Landscape paint or a garden hose for marking
- Work gloves and eye protection
- Crushed stone or sand for a firm base, if your soil is soft
Step-by-Step: How to Install Col-Met Steel Edging
Step 1: Dig a Trench to the Correct Depth
Dig a trench along your marked line that is deep enough to bury the strip so its top sits just above grade. For most steel strips of typical height, that means a trench roughly the strip height plus a half inch to an inch, with the top edge flush with or slightly below the mulch line. Keep the trench walls as vertical as you can, so the steel sits against soil instead of air pockets.
Step 2: Set a Firm Base
In loose or sandy soil, add 1 to 2 inches of compacted crushed stone or sand to the bottom of the trench. This keeps the strip from sinking and helps it stay level over freeze-thaw cycles. Tamp the base with a hand tamper or the end of a piece of lumber until it feels solid underfoot.
Step 3: Lay and Align the Sections
Set the first section into the trench and check it with a level. Steel edging should sit with its top edge straight and parallel to the finished grade, not tilted toward the lawn or the bed. Lay subsequent sections end to end, overlapping or joining them according to the manufacturer’s connector method. Check alignment with a string line every 4 to 6 feet on straight runs.
Step 4: Drive the Stakes
Drive stakes through the inside of the strip, on the bed side, at the spacing the manufacturer recommends. A common guideline for steel edging is a stake every 12 to 18 inches on straight runs and closer on curves. Drive each stake with a mallet until its head is just below the top of the strip, so the stake does not stick up and snag a mower or trimmer.
Step 5: Cut Sections and Finish the Ends
Measure each cut carefully and cut with tin snips or a metal blade, leaving no burrs. Deburr sharp edges with a file or a few passes of sandpaper to protect your hands and any nearby plants. At ends that meet a patio or driveway, butt the strip tightly against the hardscape and seal any gap with a bead of exterior-grade caulk or a small strip of mortar if the area is high traffic.
Step 6: Backfill and Check Level
Backfill along the bed side of the strip and tamp the soil lightly to remove air pockets. Recheck the level along the entire run after backfilling, since settling can shift the strip. Make small corrections by lifting the section and adding or removing base material as needed. Finally, rake the lawn edge and bed edge so the line reads cleanly.
Recommended Gear
- Edging spade: A flat, sharp spade makes straight, vertical trench walls, which is key for a snug fit. View on Amazon
- Dead-blow hammer: Sets steel strip and stakes without bouncing or bending the metal. View on Amazon
- Aviation snips: Cut steel cleanly with less burr than a hacksaw, which saves time on deburring. View on Amazon
- 4-foot level: Keeps the top edge flat along long runs so the mulch line looks even. View on Amazon
Common Mistakes and Tips
- Setting the strip too high. A strip that sits proud of grade catches mower decks and string trimmer heads. Keep the top edge at or just below grade.
- Skipping the base in soft soil. Without a compacted base, steel tends to sink unevenly and show waves within a season.
- Too few stakes. Insufficient staking allows bowing, especially under mulch load. Add stakes at joints and on curves.
- Sharp cut ends left exposed. Deburr every cut to avoid scratches on skin and shoes.
- Tight curves. Steel will kink if forced too sharply. Plan wide, smooth radii and bend sections gradually.
- Ignoring rust on cut edges. Touch up cut ends with a rust-inhibiting paint to extend service life.
If you are comparing this material to alternatives, our overview of Metal Lawn Edging: Steel and Aluminum Pros and Cons covers how steel stacks up against aluminum for different yards. For a deeper look at galvanized options, see 6 Best Galvanized Steel Landscape Edging Options for Clean Lawn Lines.
FAQ
Is col-met steel landscape edging easy to install yourself?
Yes, for most homeowners. The job requires digging a shallow trench, setting the strip level, and driving stakes. Plan for a few hours per bed, longer for large or curved runs. Consult a professional if you run into buried utilities or extensive grading issues.
How deep should I bury steel edging?
Bury the strip so its top edge sits at or slightly below finished grade, following the manufacturer’s height specification. Burying it too deep makes it hard to see and can trap moisture, while leaving it too high creates a trip and mower hazard.
Does steel edging rust?
Coated and galvanized steel resists rust for many years, but cut ends and scratches can corrode. Touch up exposed cut edges with a rust-inhibiting paint, and check the product’s coating specification for expected service life.
How far apart should the stakes be?
A common guideline is every 12 to 18 inches on straight runs, with closer spacing on curves. Always follow the stake spacing printed by the manufacturer for your specific product.
Can I install steel edging on a curve?
Yes, but keep the radius gentle. Tight curves cause kinking and make the strip hard to hold in position. Lay out the curve with a hose first, then bend the strip gradually as you set it.
Do I need a base under steel edging?
In firm, well-draining soil a base may not be necessary. In loose, sandy, or clay-heavy soil, add 1 to 2 inches of compacted crushed stone or sand so the strip stays level through seasonal soil movement.
Will steel edging work with mulch and gravel?
Yes. Steel edging holds mulch and gravel well because the thin wall sits flush with the surface. Keep the top edge at or slightly above the material depth so loose material does not spill onto the lawn.
Conclusion
Col-met steel landscape edging gives you a crisp, durable border when it is measured, leveled, and staked correctly. Focus on a firm base, a top edge that sits at grade, and enough stakes to keep runs straight. With those basics in place, your lawn and beds will hold clean lines through mowing seasons and weather changes.