 By Caleb Morgan
Updated November 2026
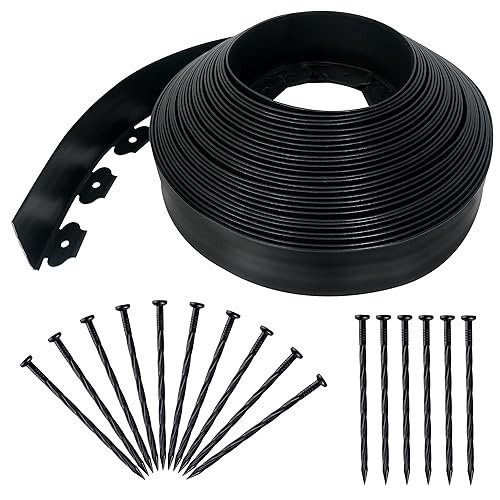
8 inch plastic landscape edging is a practical way to separate your lawn from beds, gravel, and walkways without the cost and labor of masonry. In this guide, you will learn how to pick the right profile, measure and plan your border, install the strips so they stay straight and level, and avoid the mistakes that cause heaving and gaps later. The process takes a weekend for most residential yards and needs only basic hand tools.
What 8 Inch Plastic Edging Is Best Suited For
An 8 inch height refers to the visible strip above grade once it is installed. Most manufacturers sell these panels in lengths around 10 feet, and the buried portion is typically several inches deep, depending on the model. That height works well for keeping turf roots and grass runners out of mulched beds, containing pine straw or wood chips, and defining a curved or straight edge along a driveway or sidewalk.
It is less suitable for holding back heavy soil slopes or retaining significant grade changes. For retaining work, a different product class is needed. If you are comparing heights, the guide to 7 Best 12 Inch Tall Landscape Edging Options for Clean Borders covers taller profiles that handle more pressure.
Tools and Materials You Will Need
- 8 inch plastic edging panels (enough length plus 10 percent for waste)
- Landscape spikes or stakes, usually supplied with the kit
- Garden hose or marking paint for layout
- Flat spade or edging spade
- Rubber mallet
- Tape measure and a 4-foot level
- Utility knife or hacksaw for cutting panels
- Wheelbarrow and gravel or sand for leveling, if needed
How to Install 8 Inch Plastic Landscape Edging Step by Step
Step 1: Lay Out the Border
Lay a garden hose in the shape you want, or spray a line with marking paint. Step back from the layout and check it from several angles before you dig. Smooth curves look better than tight kinks, and gentle radiuses are easier to follow with rigid panels. Mark any location where you plan to join two runs.
Step 2: Dig a Trench to the Correct Depth
Use a flat spade to cut a shallow trench along the marked line. The trench should be deep enough to bury the bottom of the panel at the depth the manufacturer specifies, typically a few inches so the top edge sits just above the surrounding grade. Keep the trench width roughly equal to the panel thickness so the material sits snugly against the soil.
Step 3: Set and Level the Panels
Place the first panel in the trench and check it with a level. Plastic panels can flex, so use a long straight board or the level itself along the top edge. Add or remove a small amount of sand or fine gravel under the bottom edge to bring the line level or to match a gentle slope. Work in sections of 8 to 10 feet, checking as you go.
Step 4: Join Sections Properly
Most panels overlap or connect with interlocking tabs. Overlap the joint by the amount the manufacturer recommends, usually a few inches, and drive a spike through the overlap so the joint does not separate. Leave a small expansion gap only if the instructions call for it; plastic expands slightly with heat.
Step 5: Stake the Edging
Drive landscape spikes through the slots or holes on the outer face of the panel at intervals of about 12 to 18 inches. Set each spike so its head sits just below the top rim of the edging. Drive spikes at a slight angle away from the bed, which helps the edging resist being pushed outward by soil and roots.
Step 6: Backfill and Clean Up
Backfill the trench on both sides so the soil is firm against the panel. Tamp lightly by hand. Check the line again after a rain, since loose soil can settle and shift the panel. Trim any protruding spike heads and sweep debris from the top rim.
Measuring and Estimating Quantity
Measure the perimeter of each bed with a tape measure or a rolling measuring wheel. Add up all straight and curved runs, then add 10 percent for cutting waste and overlap at joints. Count corners separately, since some systems require specific corner pieces or extra spikes at each turn.
| Item | Typical Spacing or Quantity | Notes |
|---|---|---|
| Edging panels | Total run length plus 10 percent | Account for overlap at each joint |
| Spikes | One every 12 to 18 inches | Add extra at corners and joints |
| Trench depth | Per manufacturer spec | Bury enough to resist heaving |
| Leveling sand or gravel | About 1 inch as needed | Use for low spots only |
Common Mistakes to Avoid
- Installing on uneven ground without leveling. A dip under one panel will show as a visible wave in the line. Correct it before you stake.
- Too few spikes. Plastic edging relies on staking to hold its line. Skipping spikes on curves is the most common reason panels pull out.
- Setting the top too high. A panel sitting well above the lawn can trip mowers and look unfinished.
- Forgetting frost and soil movement. In freeze-thaw climates, shallow installs can heave. Bury the edging as deeply as the spec allows.
- Cutting panels without checking the profile. Cut ends may need capping or overlapping to keep the edge clean.
Tips for Clean, Long-Lasting Lines
- Install after rain, when soil is soft enough to dig easily but not muddy.
- Keep the mower wheel on the lawn side of the edging to prevent scalping the rim.
- Check the line each spring and re-drive any spikes that have lifted.
- For a formal look, run the top rim at a consistent height and keep mulch level with it.
Recommended gear
A sturdy flat spade makes trench work faster and gives you clean walls. Search for a Fiskars Steel Digging Spade (a widely sold garden spade) View on Amazon.
A rubber mallet helps seat spikes and tap panels into level without cracking the plastic. Look for a Estwing Rubber Mallet View on Amazon.
A 4-foot aluminum level lets you check long runs in one pass, which matters more than shorter bubble levels for edging. Search for a Johnson Level 4 foot aluminum level View on Amazon.
FAQ
How deep should 8 inch plastic edging be buried?
Follow the manufacturer’s stated burial depth, which is usually a few inches. Burying the bottom edge keeps the panel from tipping and helps it resist frost heave.
Can I install it on a slope?
Yes, but step the panels or set each section level so the top rim stays even. On steep grades, add more spikes to hold each section.
Do I need concrete to set it?
No. Standard 8 inch plastic edging is installed with soil backfill and spikes. Concrete is generally unnecessary and can make future adjustments harder.
How many spikes do I need per foot?
A common spacing is one spike every 12 to 18 inches, with extra spikes at corners and joints. Check the kit instructions, since spacing varies by product.
Will a lawn mower damage the edge?
Mowers can nick or scalp the top rim if the wheel rides on the edging. Keep the wheel on the grass side and trim close with a string trimmer where needed.
Can I cut the panels with ordinary tools?
Yes. A hacksaw or a sharp utility knife works for most plastic panels. Cut slowly to avoid cracking the material.
How long does plastic edging last?
Lifespan depends on UV exposure, soil conditions, and install quality. Owners often report several seasons of service with regular spike checks, but results vary by climate and product grade.
Should I use it with mulch or stone?
Both work well. Mulch and pine straw are easy to contain with 8 inch edging. For a broader comparison of materials, see What Are the Best Options for Landscape Edging? 7 Choices Compared.
Conclusion
8 inch plastic landscape edging gives you clean, durable lines when it is measured, leveled, and staked correctly. Plan your layout, bury the panels to the recommended depth, and drive spikes at consistent intervals. A little attention at installation saves a lot of re-work later.
Related reading
Ready to choose one?
About Caleb Morgan
Caleb Morgan is part of our editorial team and reviews and edits our lawn edging & trimming guides, checking product details against manufacturer specifications and owner feedback.